Deploying Django Application on Ubuntu 20.04 Server with NGINX

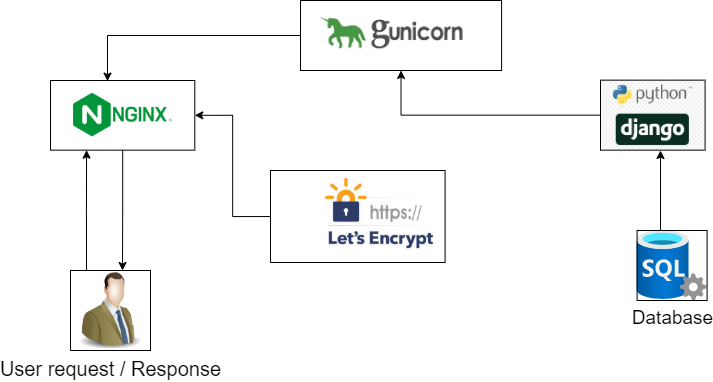
This blog post is intended for the demonstration of deploying django application in ubuntu 20.04 This guide is a walk-through on how to setup Ubuntu Server for hosting Django websites. The Django stack that will be used in this guide is Ubuntu, Nginx, and Gunicorn. This stack was chosen solely because from the reading I've done these seems to be one of the latest "standard" stacks for Django deployment. This guide also assumes that you're familiar with Ubuntu server administration and Django. Also of note, the sample code used for deploying demonstrated in the blog can be found here:
Hosting django application might be painful for beginner but not anymore. I will go through each step for you to guide on hosting the django application on NGINX environment on Ubuntu 20.04. Though I have implemented this on ubuntu 20.04, It is useful for ubuntu 18.04 as well. Let's straightly dive into each steps:
-
Activate the virtual environment if you have any:
# Activate as per your virtual environment path # Mine is like this Source /yourenv/bin/activate # for linux environments -
Let’s create a Django sample project with following code:
# Creating Django project as sample for hosting # You can create your own but project name has to be adjusted accordingly on upcoming steps django-admin startproject djangoHostTutor -
Install Gunicorn inside the virtual environment which will establish connection between our Django app and NGINX server. Use following code to do so.
# Installing gunicorn package pip install gunicorn -
Next we create a systemd service file for gunicorn with the following command:
# make your adjustments in file names sudo nano /etc/systemd/system/krishna_blog.service -
Copy paste following content and make changes as per you file names:
[Unit]
Description=gunicorn daemon
Requires=blog.socket
After=network.target

[Service]
User=root
Group=www-data
WorkingDirectory=/home/ubuntu/DjangoHostSample
ExecStart=/home/ubuntu/blogEnv/bin/gunicorn --workers 3 --bind 127.0.0.1:8002 djangoHostTutor.wsgi:application # this line must be single line with above line(due to width)

[Install]
WantedBy=multi-user.target
Please
-
Everytime you make changes to your python files, if you want to add or update any project file — you will need to restart the systemd files:
sudo systemctl restart krishna_blog.service # Alternatively you can also run this sudo systemctl restart krishna_blog -
Let's go to NGINX setup: first install Nginx server inside Ubuntu:
sudo apt update sudo apt install nginx -
Create a new config file for nginx server to host our django app with following:
Sudo nano /etc/nginx/sites-available/blogSample -
Copy Following content and make your adjustments for domain and other project folders:
server { listen 80; listen [::]:80; charset utf-8; server_name blog.kaflekrishna.com.np access_log /var/log/nginx/blog_krishna_access.log; error_log /var/log/nginx/blog_krishna_error.log; gzip on; gzip_types application/json; location = /favicon.ico { access_log off; log_not_found off; } location /static/ { alias /var/www/sampleHost; } location / { proxy_pass http://127.0.0.1:8002; } } -
Now make your application live by enabling it with following:
sudo ln -s /etc/nginx/sites-available/blogSample /etc/nginx/sites-enabled -
Restart your NGINX server:
sudo systemctl restart nginx -
Now your application should be live by your attached domain. Please check it and we will proceed to enabling SSL with let's encrypt
-
Install Cerbot for this:
sudo apt-get update sudo apt-get install python-certbot-nginx -
Enable SSL for domain:
sudo certbot --nginx -d blog.kaflekrishna.com.np

0 Comments